EnviroKarma.org - Electric Vehicle (EV) Conversion '...it's (NOT) hard to be Green' - what Kermit should have said


Click to receive email when updates are posted to this page:
Powered by ChangeDetection.com

Electric Motor Install for the Suzuki Swift (Geo Metro/Pontiac Firefly)...

    I got my motor/tranny adapter from CanEV.com rather than design and machine one locally. It was a little pricey, but without precision measuring equipment, hiring a shop to do it probably would have been even more expensive. This setup does retain the clutch, which I think is the best way to leave the car 'drivable' by anyone un-used to clutchless shifting.

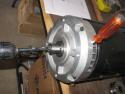
    So, the first step is to remove the clutch/flywheel from the ICE. Before you remove the pressure plate, be sure to mark the alignment of the plate to the flywheel to retain the balance. Once the plate and clutch are out, the flywheel can be removed. I debated getting a new clutch plate and pilot bearing while things were apart, but there looked to be a fair amount of wear left; more than .5 mm to the shallowest rivet. So, I gave everything a quick wipe and set aside to install to the electric motor.

    Before assembling the adaptor and clutch, I checked the adaptor fit to the transmission. Good thing I did; the alignment bushings had been installed on the wrong side of the plate ?! I pulled them out and installed on the tranny side of the adaptor. The CanEV sticker was also on the 'wrong' side of the plate which will be inside the bell housing, but that won't matter. I was not real happy with the fit of the bottom edge of the plate against the tranny bell housing as it had been trimmed a little too close rather than allow a little overlap along the entire edge of the bell housing, but it should be ok. There was also one extra bolt hole not matching the bell housing at all.... so the plate probably fit other engines that were slightly different. The pilot bushings all lined up with the appropriate bolt holes once I put them on the correct side, so I moved ahead...

    The installation instructions from CanEV have a fairly serious error at this point... The instructions say to drill a 7/16 hole 3/8 deep in the end of the motor shaft. Presumably this is to allow the end of the driveshaft sticking through the pilot bushing to stick thru.... although I don't think it goes in that far. Anyway, the numbers should be reversed; with 'a 3/8 dia hole 7/16 deep' if it is to match the driveshaft. I decided to go ahead and do that just in case the endof the driveshaft sticks through. I just locked the motor shaft by sticking a screwdriver into the cooling fan blades, and drilled down the pilot hole that was already there.

    The rest of the installation of the adaptor, hub, flywheel, and clutch were uneventful. I did drill a dimple down the non-keyed set screw hole, and did use locktite on both the set screws in each shaft hole. I also used locktite on the hub bolts and torqued to specs...

    I rigged the motor in a sling (kid's swing seat) from the engine hoist and wiggled it right in with no problems. It is important to take the final engagement of the flywheel to driveshaft nice and slowly, lining things up carefully along the way. I had the car in gear, and was turning the axle with one hand while wiggling the motor assembly and feeling for engagment of the splines/driveshaft. Sure enough, there was a slight clunk and the motor impeller started turning as I turned the axle.... So, I installed bolts and cranked the adaptor/tranny tight.

    I left the motor supported by the crane at this point because I want to fabricate a motor mount at the left end, and an axle/tranny plate inthe center back before going any further.


Total time to assemble motor/adaptor/clutch and install: 1.75 hours


Web Site Design and Maintenance By Emerging Technology Services

Disclaimer of Liability and Assumption of Risk: Working with high voltages in electric vehicles can be dangerous. Working with welding equipment or plasma torch or sawzall and other power tools necessary to fabricate battery racks or create holes necessary to lay the battery racks within an electric vehicle can be dangerous. The purchaser/builder solely assumes all risk. Further, the viewer of this site, and builder of the vehicle, agree to hold harmless Daniel T. Baker and any associates from all loss, liability, or damage resulting from any failures or defects in any project completed with these instructions. It is suggested that the builder follow common-sense safety procedures, such as the utilization of gloves where working with high voltages, and ear protection and goggles when working with power tools.